> For the complete documentation index, see [llms.txt](https://docs.sprinthub.com/llms.txt). Markdown versions of documentation pages are available by appending `.md` to page URLs; this page is available as [Markdown](https://docs.sprinthub.com/en/topics/system-settings/custom-domain/godaddy-dns.md).
# GoDaddy DNS
Connecting your SprintHub platform to a custom domain through GoDaddy is a straightforward process that strengthens your brand identity and provides a more consistent user experience. Follow this guide to set up your custom domain.
**Purchasing a Domain on GoDaddy**
**Access Domain Management**:
* In the GoDaddy dashboard, go to "My Products" and click "Manage" next to the domain you want to connect to SprintHub.
When you access DNS, click on New Record:
**After clicking, another screen will appear, and the following will be done:**
* A CNAME-type point
* a name for the subdomain, for example "lp"
* and point to sh.sprinthub.site
**Set Up the Domain**:
* In SprintHub, under system settings, look for the "Custom Domain" section and enter the custom domain you configured in GoDaddy.
After connecting, your domain will appear on the screen and waiting for AWS validation; click on "options" to see the tutorial on how to make the AWS point:
A screen like this will appear:
* **Instructions**:
1. Access your domain's DNS records.
2. Add a new record in the DNS settings by selecting CNAME as the record type.
3. Return to the first window, copy the contents of the "Marker / Host" field.
4. Paste the copied content into the "Marker or Host" field of your DNS records.
5. Return to the first window and copy the contents of the "Target / Destination" field.
6. Paste the copied content into the "Destination or Target" field of your DNS records.
* **Verification CNAME Record**:
* **Record Type**: CNAME
* **Record Name "Marker / Host"**: A generated value appears (a unique alphanumeric code).
* **Value "Destination / Target"**: A specific generated value (also an alphanumeric code), pointing to an AWS domain for validation.
These instructions are to ensure that the custom domain is validated correctly when configuring the CNAME record on the DNS server.
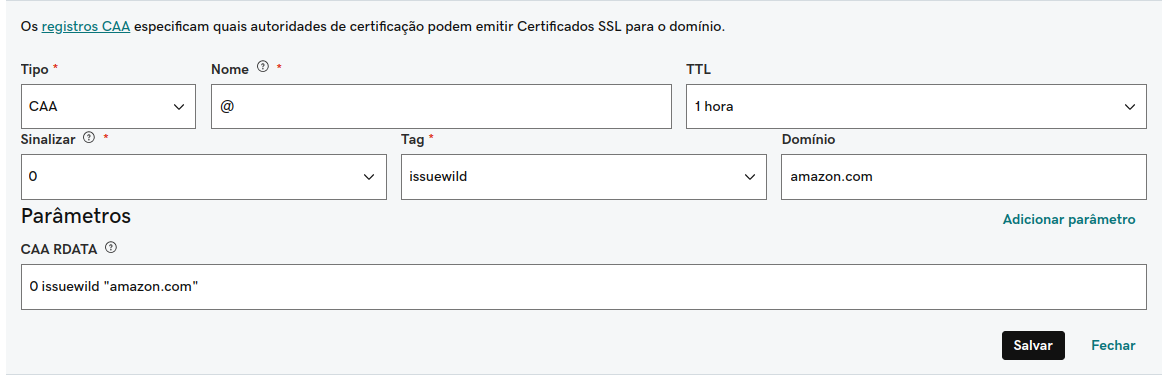
After this process, it is necessary to create two CAA records:
{% hint style="warning" %}
One is of type "Issue" and the other is "Issuewild"
{% endhint %}
Here are the details of the record:
* Type: CAA
* Domain: @ or your own domain
* Flag: 0
* Tag: Only for specific hostnames / Allow only wildcard characters
* Domain Name: amazon.com
**Verify the Configuration**:
* After adding the domain in SprintHub, the system may request domain verification. This is usually done automatically, but it may take a few hours for DNS changes to propagate.
**Test the Connection**
**Access Your Domain**:
* After the DNS records have propagated, visit the domain to make sure it is redirecting correctly to your SprintHub project.
**Verify SSL Certificate**:
* SprintHub will automatically generate an SSL certificate for your custom domain. Make sure the connection is secure (showing the padlock next to the URL in the browser). Or use a tool, such as the one in the link below, to check whether it has already been propagated.
{% embed url="" %}
#### Conclusion
Now your custom domain is connected to the SprintHub platform, providing a professional and cohesive experience for your users. With this setup, you are ready to maximize the visibility and impact of your online project.
If you have questions or need additional help, the SprintHub support team is available to assist!